

One of my new year's resolutions is to create more handmade photography props as well as blog at least once a week. Here's to killing two birds with one stone!
Starting out as a newborn photographer, it quickly became clear that this is a very expensive business and requires a hefty investment. A simple newborn set-up includes a custom beanbag, backdrop stand, backdrop blankets, baskets, wraps, hats, and headbands. Not to mention the professional photography equipment! I have always loved crafts and if I see something that looks possible to recreate, I will try my hand at it before shelling out lots of money (most sets start around $45!). So when I started seeing sweet little pants in newborn portraits, I knew I had to find a way to make them and incorporate them in my own sessions.
First, I headed to a local thrift store to find a few sweaters (or you could just go digging around your closet). I ended up buying 3 sweaters made from different materials for a whopping $9.oo!
The hat was very very simple. I cut a sleeve off a sweater, turned it inside out, sewed up the edge, turned it back, and used some yarn to tie it closed. That. Was. It.
Go make yourself some newborn hats!
Now for the pants:
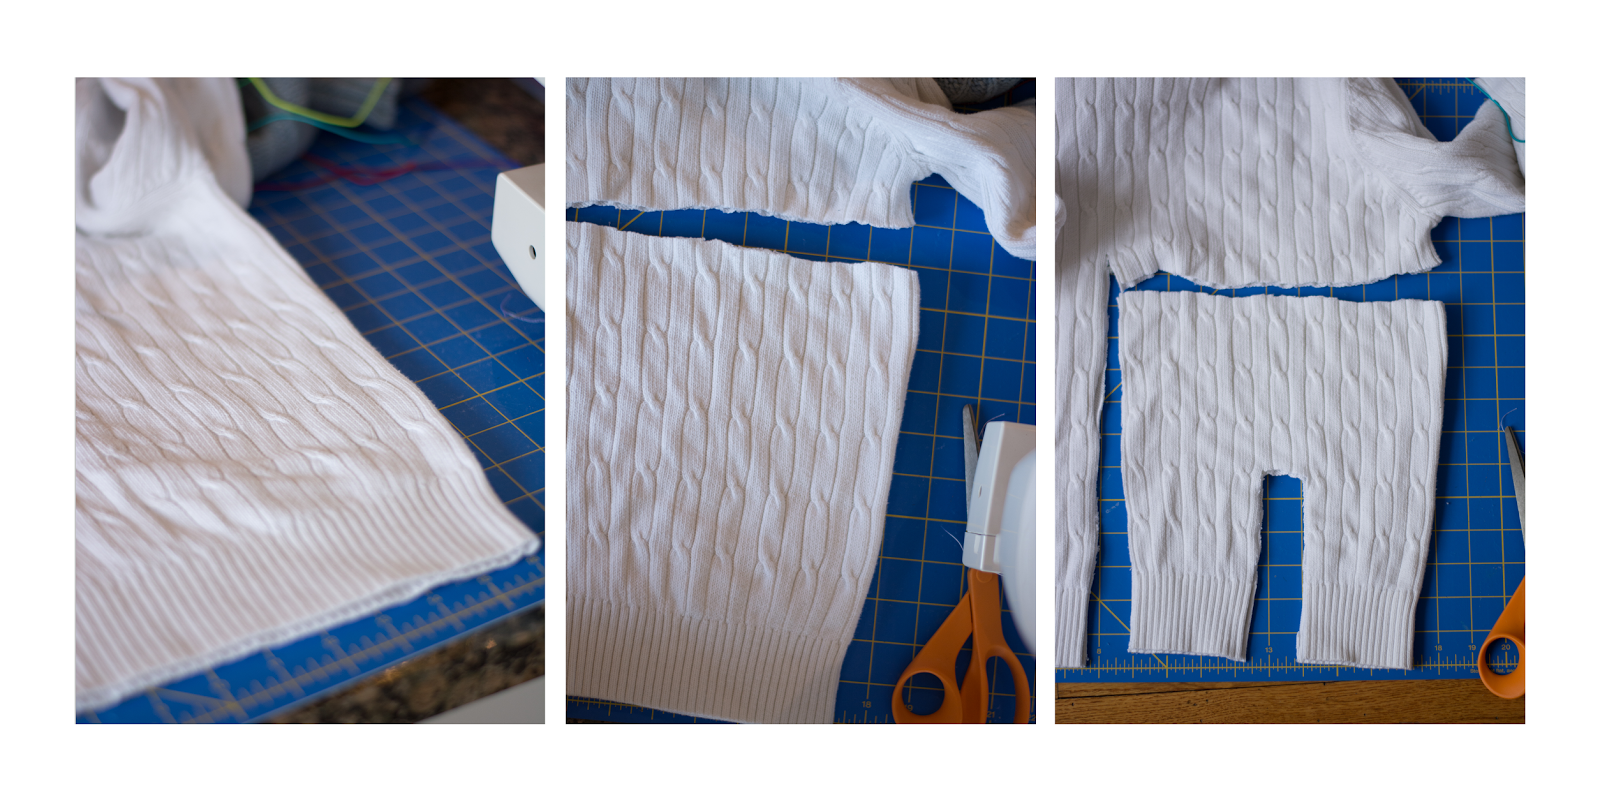
Turn the fabric wrong side out and pin all around the edges. Sew the length of the leg with about 1/4" seam allowance. Then sew along the U-shape to form the legs. I recommend testing out your sewing machine with the one inch wide strip to get your settings correct before beginning on the pants. In order to form the waistband, fold down the top edge about 3/4" and pin. I would wrap whatever string, yarn, or elastic you want for the drawstring around the waist before sewing. It was much easier than trying to feed a thin piece of yarn through after the waistband was already formed.

Turn your work right side out, and don't mind the strangely wide waist, it will get synched up in a moment. Poke to small holes in the waistband and pull out both sides of your drawstring, tightening the waist. Take a moment to marvel at your handiwork! You can stop here and have a delightfully cute newborn prop, or take it to another crafty level and find some scrap fabric to sew on little pockets, knee patches, or ruffles!


Thanks to little premie Percy for being my first model :-)
I would love to see the pants you create! Feel free to post a link to your photo page so we can see the props in action.
Such a great way to save money and get some new props. But once you start it's hard to stop :)
ReplyDeleteThank you for the tip!! I cant wait to try this out!!!
ReplyDelete